In this tutorial we will look at 5 simple things you may want to do with your new system. In most cases we will use graphics blocks to create our scenes - which means you can use the Home Center 2 or the Home Center Lite. However, in some cases there are times when you will need the advanced capabilities of Lua, which are only available on the Home Center 2.
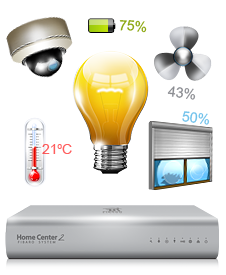
WHAT CAN I DO?
After trying the examples in this article, experiment with your system and you will come up with your own unique scenes.
Below you will find one possible way to achieve the following automatic actions:
- Turning on a light when the door opens
- Turning on a fan when a light turns on (and off again 5 minutes later)
- Sending a push notification when there is a flood
- Sending an email when the power on a wall plug drops below a set level
- Changing the set point of a thermostat when a window is opened
TURNING ON A LIGHT WHEN THE DOOR OPENS
Wouldn’t it be nice if your lights could turn on when you opened the door?
HOW TO DO IT
What you need
1 x Fibaro Door/Window Sensor
1 x Fibaro Dimmer Module
The scene
Create the following graphic blocks scene:
- Click Scenes and then Add scene.
- Give your new scene a name and choose the room it relates to.
- Click the blue Save button on the right of the page.
- Click the Advanced tab.
- Click the + and locate the Door/Window Sensor under Devices.
- Change the green box to Breached (as opposed to Opened which is for blinds).
- Change the second yellow word from And to Then.
- Click the last + and locate the Dimmer module under Devices.
- Click Save.
Some notes and further ideas
This scene will turn the light on when the door opens, but it will not turn it off - use your light switch or mobile device for this. It will also turn the light on regardless of the need for light - even when it is daytime. Further logic could be added in the top section to only turn the light on if the door is open AND there is light - you would need a lux level detector for this (like the Fibaro Motion Sensor for example).
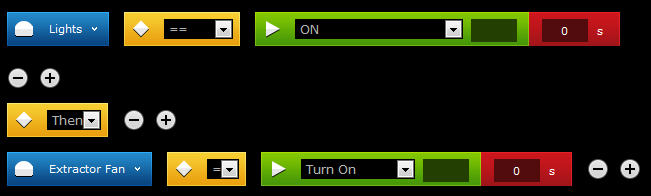
TURNING ON A FAN WHEN A LIGHT TURNS ON (AND OFF AGAIN 5 MINUTES LATER)
HOW TO DO IT
What you need
1 x Fibaro Dimmer Module
1 x Fibaro Dual or Single Relay Module
The scene
Create the following graphic blocks scene to turn the fan on:
Create the following graphic blocks scene to turn the fan off:
- Click Scenes and then Add scene.
- Give your new scene a name and choose the room it relates to.
- Click the blue Save button on the right of the page.
- Click the Advanced tab.
- Click the + and locate the dimmer module under Devices.
- Change the green box to ON (for the on scene) or OFF (for the off scene).
- Change the second yellow word from And to Then.
- Click the last + and locate the fan relay module under Devices.
- Change the green box to Turn On (for the on scene) or Turn Off (for the off scene).
- Click Save.
Some notes and further ideas
As you can see, with graphics blocks you need to have two scenes to control each fan. Using Lua on the Home Center 2, you can combine these into one scene and delay the fan turning off by a set amount of time.
--[[
%% properties
93 value
%% globals
--]]
local lightID = 93 -- change in the trigger if you change it here
local fanID = 99
local fanDelay = 5 * 60 -- 5 minutes (the value is in seconds)
-- Only allow one instance of the current scene to run at a time
if (fibaro:countScenes() > 1) then
  fibaro:abort()
end
local value, timestamp = fibaro:get(lightID, 'value')
if (value == '0') then -- is the light off?
  -- the light has been turned off
  -- keep looping until the light has been off for 5 minutes
  while ((value ~= '0') or ((os.time() - timestamp) < fanDelay)) do
    fibaro:sleep(1000) -- let other things happen for a second, just wait here
    value, timestamp = fibaro:get(lightID, 'value')
  end
  -- the light has been off for long enough now.
  fibaro:call(fanID, 'turnOff') -- turn off the fan
else
  -- the light has been turned on
  fibaro:call(fanID, 'turnOn') -- turn on the fan
end
SENDING A PUSH NOTIFICATION WHEN THERE IS A FLOOD
HOW TO DO IT
What you need
1 x Fibaro Motion Sensor
A smart device that receives push notifications.
The notification
Create a notification to be pushed to the mobile device:
- Click Panels in the top menu.
- Click Notifications Panel in the left hand menu.
- Click Add New at the top of the left hand menu.
- Enter a name for the notification (We will use Flood in this example).
- Enter a message and copy it to all three boxes (SMS, email and Push).
- Click Save.
The scene
Create the following graphic blocks scene:
- Click Scenes and then Add scene.
- Give your new scene a name and choose the room it relates to.
- Click the blue Save button on the right of the page.
- Click the Advanced tab.
- Click the + and locate the flood sensor under Devices.
- Change the green box to Breached.
- Change the second yellow word from And to Then.
- Click the last + and Hover over Notifications.
- Hover over Flood (or whatever you called the notification you just made).
- Hover over Push.
- Select the mobile device you wish to send the push notification to.
- Click Save.
Some notes and further ideas
This scene will push to one mobile device. You can add more notifications by:
- Clicking the + on the end.
- Choosing And under Commands in the menu.
- Clicking the + on the end.
- Selecting your second notification in the same way as above.
You can repeat these steps for as many notifications as you like.
SENDING AN EMAIL WHEN THE POWER ON A WALL PLUG DROPS BELOW A SET LEVEL
- If you have a Wall Plug attached to your washing machine, when the washing is finished you could be sent an email.
- A Wall Plug attached to a TV could detect when the TV is turned on and dim your lights.
- By affixing a Wall Plug to your fridge, you can be notified if it ever breaks down.
HOW TO DO IT
What you need
1 x Fibaro Wall Plug
The notification
Create a notification to be emailed when the scene runs:
- Click Panels in the top menu.
- Click Notifications Panel in the left hand menu.
- Click Add New at the top of the left hand menu.
- Enter a name for the notification (We will use TV Turned Off in this example).
- Enter a message and copy it to all three boxes (SMS, email and Push).
- Click Save.
The scene
Create the following graphic blocks scene:
- Click Scenes and then Add scene.
- Give your new scene a name and choose the room it relates to.
- Click the blue Save button on the right of the page.
- Click the Advanced tab.
- Click the + and locate the Wall Plug under Devices.
- Change the first yellow box to W < (for power less than) or W > (for power more than).
- Type the power you want to compare to in the dark green box.
- Change the second yellow word from And to Then.
- Click the last + and Hover over Notifications.
- Hover over TV Turned Off (or whatever you called the notification you just made).
- Hover over e-mail.
- Select the user you wish to send the email to.
- Click Save.
Some notes and further ideas
This scene will email to one user. You can add more by:
- Clicking the + on the end.
- Choosing And under Commands in the menu.
- Clicking the + on the end.
- Selecting your second notification in the same way as above.
You can repeat these steps for as many notifications as you like.
More complex scenes (for example, reacting one way when the device turns on and another way when it turns off) can be written using Lua, which is only available on the Home Center 2.
CHANGING THE SET POINT OF A THERMOSTAT WHEN A WINDOW IS OPENED
Fitting a Fibaro Door/Window Sensor to the windows in your home and turning your thermostat’s set points down automatically if the windows are opened may be the answer to your problem.
HOW TO DO IT
What you need
1 x Fibaro door/window sensor for each window in the room, and
1 x Z-Wave radiator valve for each wet radiator in the room, or
1 x Fibaro single relay configured as a linked device for each electric heating device
The scene
Create the following graphic blocks scene:
- Click Scenes and then Add scene.
- Give your new scene a name and choose the room it relates to.
- Click the blue Save button on the right of the page.
- Click the Advanced tab.
- Click the + and locate the door/window sensor under Devices.
- Change the green box to Breached.
- Change the second yellow word from And to Then.
- Click the last + and locate the thermostat under Devices.
- Enter the new set point (in this case 5) into the dark green box.
- Click Save.
Some notes and further ideas
You can add more windows in this room by:
- Clicking the + at the top.
- Choosing Or under Commands in the menu.
- Clicking on the + at the top.
- Selecting the next window you want to monitor from Devices.
- Changing the green box to Breached.
You can add more actions than just turning down your heating by:
- Clicking the + on the end.
- Choosing And under Commands in the menu.
- Clicking on the + on the end.
- Selecting the next action you want to perform.
This scene will turn your heating down to 5 degrees to prevent frost. When the window closes again the heating needs to turn back up. You could write a scene in graphics blocks to do this but the level it sets the heating to would be a fixed level.
A better way to achieve this task would be to use Lua on a Home Center 2 and have the following scene:
--[[
%% properties
98 value
417 value
%% globals
--]]
local windowIDs = {98,417} -- change this at the top if you change it here
local thermostatID = 117
-- Only allow one instance of the current scene to run at a time
if (fibaro:countScenes() > 1) then
  fibaro:abort()
end
function windowOpen()
  local res = false
  -- check all the windows - are any open?
  for key, windowID in pairs(windowIDs) do
    -- is this window open?
    res = (res or (fibaro:getValue(windowID, "value") == '1'))
  end
  return res
end
local oldSetPoint = 'unknown'
if (windowOpen()) then
  oldSetPoint = fibaro:getValue(thermostatID, "value")
  fibaro:call(thermostatID, "setTargetLevel", "5")
  while windowOpen() do
    fibaro:sleep(1000)
  end
  fibaro:call(thermostatID, "setTargetLevel", oldSetPoint)
  fibaro:sleep(100) -- make sure the message has gone through
end
In this scene there are two windows (98 and 417); change these to match your system. Place any windows into the table on line 8 and make sure you add them in the triggers section (lines 3 and 4 here) as well.
WHERE NOW?
For more information on Lua, see our Lua support page.