
REDUCING MAXIMUM DIMMING TO 80%
HOW TO DO IT
What you need
1 x Fibaro Dimmer Module for each lighting circuit you want to save energy on.
The parameters
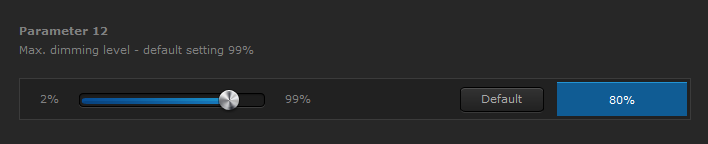
Change the value of parameter 12 (Max. dimming level) to 80%:
- Click Devices and locate the dimmer you wish to modify
- Click the spanner icon in the top right of the device to enter the device’s properties
- Click the Advanced tab
- Scroll down until you see parameter 12
- Use the scroll bar to set it to 80% (or type directly in the blue box)
- Click Save.
- Do this for every dimmer you wish to modify
Some notes and further ideas
The dimmer will limit the maximum brightness to the value you set in parameter 12, however, the slider shown in the app and web interfaces will show this new value as 100%. So, with the settings above, setting the slider on the interface to 50% will cause the dimmer to dim to 40% (50% of 80%).
Different types of lamp will have different points at which your eye will be able to distinguish the change in brightness. So you will need to experiment with the levels - you may find you could save up to 40% of your energy if the lamp only started dimming below 60%.
CREATING A “WE’RE OUT” BUTTON
Wouldn’t it be better to have an “I’m going out” button by the door which you could press on the way out? With one press, your internal lights wold turn off, your external lights would turn on and your heating would turn down.
Using Lua, we can monitor Fibaro dimmer module’s scene activation event - this allows us to identify the number of times a switch has been clicked. In this way, we can use the switch by the front door to control its usual lights, but have a double click perform the “I’m going out” actions.
HOW TO DO IT
What you need
1 x Fibaro Dimmer Module
Various other modules controlling the other devices in the home you want to control upon leaving.
The scene activation parameter
The scene activation event is disabled by default when the Fibaro Dimmer module leaves the factory. To trigger different scenes when the button is pressed once, twice or three times, you need to activate parameter 41 of the dimmer.

- Click on Devices in the top menu
- Locate the dimmer which is attached to the switch at your front door
- Click the spanner icon in the top right of the device to go to the Dimmer’s properties page
- Click on the Advanced tab
- Scroll down to the very bottom of the page to parameter 41
- Click the second option ‘activation of the functionality’
- Click the blue save button on the right hand bar
The scene
Now that scene activation is enabled, we can write a scene that can be triggered by it. In the following example, the dimmer’s device ID is 30, change it as necessary:
--[[
%% properties
30 sceneActivation
%% globals
--]]
local lightID = 30
local scene = fibaro:getValue(lightID, 'sceneActivation')
-- 16 == single click: ignore it - let light turn on and off as normal.
if (scene == '14') then -- double click
  -- actions for double clicks go here
elseif (scene == '15') then -- tripple click
  -- actions for tripple clicks go here
end
- Click Scenes and then Add scene.
- Give your new scene a name and choose the room it relates to.
- Click the Advanced tab and choose the second Save button - next to Lua.
- Click the blue Save button on the right of the page.
- Click the Advanced tab.
- Type the Lua code shown above, replacing any code that was generated by the HC2.
(Hint: Double clicking on the code will select it and allow you to copy and paste it.) - Add any actions you want to perform in the relevant section of the code.
- Click Save.
Some notes and further ideas
You can use fibaro:call() to perform the actions turnOn, turnOff and setValue on different devices, or fibaro:startScene() to run a different scene (perhaps a graphics block scene) to keep this code neat and tidy.
SWITCHING OFF LIGHTS AND HEATING IN UNOCCUPIED ZONES
Using a Fibaro Motion sensor and Lua on the Home Center 2, we can detect the absence of movement in a room and use this to turn off the lights a short while later. If movement is still absent for an extended period of time, the heating can also be turned off.
HOW TO DO IT
What you need
1 x Fibaro Motion Sensor - one for each room you want to monitor
1 x Fibaro Dimmer Module - one for each lighting circuit in each room.
1 x Fibaro Dual, Single Relay Module - one for each of the heat sources in each room.
The scene
Create the following Lua scene (in this example, our motion sensor is device 65, you will need to change it):
--[[
%% properties
65 value
%% globals
--]]
local motionID = 65
local lightDelay = 30     -- 30 seconds
local heatDelay = 15 * 60 -- 15 minutes
-- Only allow one instance of the current scene to run at a time
if (fibaro:countScenes() > 1) then
  fibaro:abort()
end
local motion, mTime = fibaro:get(motionID, 'value')
motion = tonumber(motion)
mTime = os.time() - mTime -- convert this to number of seconds ago.
function turnThingsOn()
  fibaro:call(71, 'turnOn') -- light
  fibaro:call(76, 'turnOn') -- light
  fibaro:call(84, 'turnOn') -- heat
end
if (motion > 0) then
  -- there is motion - make sure the lights and heating are on
  turnThingsOn()
else
  -- there is no motion - wait until there has been no motion for the required time
  -- then turn off the lights and then the heating.
  local lightsOn = true
  local heatingOn = true
  while ((motion == 0) and (lightsOn or heatingOn)) do
    if ((mTime >= lightDelay) and lightsOn) then
      lightsOn = false -- only let this happen once
      fibaro:call(71, 'turnOff') -- light
      fibaro:call(76, 'turnOff') -- light
    end
    if ((mTime >= heatDelay) and heatingOn) then
      heatingOn = false -- only let this happen once
      fibaro:call(84, 'turnOff') -- heat
    end
    fibaro:sleep(1000) -- give the system some breathing space
    -- then check it all again...
    motion, mTime = fibaro:get(motionID, 'value')
    motion = tonumber(motion)
    mTime = os.time() - mTime -- convert this to number of seconds ago.
  end -- jump back to the top of the loop
  -- only gets here if the loop finishes
  -- and that only happens if everything is off
  -- or there is motion again.
  if (motion > 0) then
    turnThingsOn()
  end
end
- Click Scenes and then Add scene.
- Give your new scene a name and choose the room it relates to.
- Click the Advanced tab.
- Click the second Save button - next to Lua.
- Click the blue Save button on the right of the page.
- Click the Advanced tab.
- Type in the code from above.
(Hint: Double click the code to select it then use copy and paste.) - Click Save.
Some notes and further ideas
In the above scene we have turned off relays to control the heating. If you have Z-Wave radiator valves (for example, the excellent Danfos TRVs), then rather than turning them off and on, you need to adjust their setpoints to very low (the equivalent to off) or normal (the equivalent to on). Use the fibaro:call() function to do this, but use the setValue action instead of turnOn and turnOff.
GIVING DEVICES AUTO-OFF CAPABILITY
HOW TO DO IT
What you need
Fibaro Dimmers, Fibaro Relays or Fibaro Wall Plugs for each device you want to turn off automatically.
The scene
Create the following Lua scene:
--[[
%% properties
56 value
78 value
29 value
40 value
%% globals
--]]
local devices = {56, 78, 29, 40}
local times   = {60, 30, 900, 600} -- each time (in seconds) here relates to each device above.
-- Only allow one instance of the current scene to run at a time
if (fibaro:countScenes() > 1) then
  fibaro:abort()
end
-- return true if all devices in the list are off
function allAreOff(deviceList)
  local res = true
  for key, devID in pairs(deviceList) do
    local val = fibaro:getValue(devID, 'value')
    res = res and (val == '0') -- true if this and all previous devices are off
  end
  return res
end
while (not allAreOff(devices)) do
  -- check each device to see if it needs to be turned off.
  for key, devID in pairs(devices) do
    local val, timesince = fibaro:get(devID, 'value')
    val = tonumber(val)
    timesince = os.time() - timesince
    if ((val > 0) and (timesince > times[key])) then -- it's on and it has been on for too long
      fibaro:call(devID, 'turnOff') -- turn it off
    end
  end
  fibaro:sleep(1000) -- 1 second of peace
end
- Click Scenes and then Add scene.
- Give your new scene a name and choose the room it relates to.
- Click the Advanced tab.
- Click the second Save button - next to Lua.
- Click the blue Save button on the right of the page.
- Click the Advanced tab.
- Type in the above Lua code.
(Hint: you can double click the code and then copy and paste it in.) - Modify the device IDs and times to suit your system.
- Ensure that all devices to be monitored are in the trigger section, too.
- Click Save.
Some notes and further ideas
This scene will turn off devices such as the Fibaro Dimmer, Fibaro Relay and Fibaro Wall Plug and any other device that accepts the turnOff action and sets its value property to 0 when it is off.
CAPPING SPENDING ON A GIVEN DEVICE
HOW TO DO IT
What you need
1 x Fibaro Wall Plug
1 x Fibaro Home Center 2
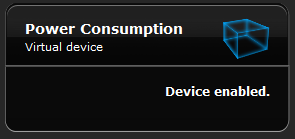
You will need to download the Power Consumption Virtual Device.
The virtual device
Download the virtual device and import it:
- Unzip the Virtual Device you have downloaded and locate the .vfib file inside it.
- Log into your Home Center 2 in your browser.
- Click Devices.
- Click Add or remove device.
- Scroll down to the third section and click Browse under Import virtual device.
- Select the .vfib file you unzipped from the download.
- Click the Import virtual device button.
- Give you new virtual device a meaningful name and room.
- Click the Advanced tab.
- Scroll down to the Main loop at the bottom of the page.
- Scroll to line 24 and change 137 to the device id of your wall plug.
- Scroll to line 25 and change 0.16 to the cost of your energy per kWh.
- Scroll to line 26 and change 2.00 to the maximum cost allowed for the device.
- Click Save.
Some notes and further ideas
This virtual device will turn off a wall plug automatically. It will not turn it on again automatically.
The virtual device measures energy used from midnight each day, not within a 24 hour period. If the wall plug turns off due to over use, it will reset at midnight.
WHERE NOW?
For some more ideas of the things you can do with Fibaro, have a look at our tutorials section.
For more information on Lua, see our Lua support page.